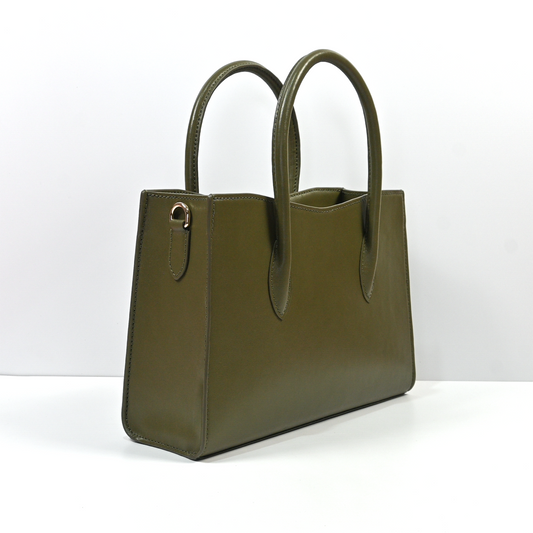
💗 Your perfect everyday bag with plenty of storage space and inner pocket 🪡 Suitable for beginners - including guarantee of success 👜Detailed instructionsfor your professional result 🫶🏼 Handmade for you: delivery time 2 - 14 days 🎁 Free shipping within DE for this product 🌟 Made of high-quality cowhide leather in a smooth or grained structure
Size of the bag The shopper has the following dimensions: 43 cm wide, 29 cm high, 15 cm deep. The bottom of the shopper is 34 cm wide and 14 cm deep. The inside pocket is 26 cm wide and 13 cm high but flat. The shopper fits a thin folder, laptops up to 35 cm wide, a large water bottle, a cosmetic bag, a sweater, the matching pouch and a few small items (purse, sunglasses, make-up, keys, cell phone). The shopper is a real space miracle!
variants If you don't need that much space and would rather wear the shopper in a bucket bag version, you can use one of three strap settings to make the shopper smaller. Then it has approximately the following dimensions: 34 cm wide (limited by the size of the bottom of the bag - the opening is still approx. 28 cm), 29 cm high and 18 cm deep.
Carrying options The leather handles of the shopper are attached to the body of the bag with binding screws.
In addition to the regular carrying version of the shopper with the leather handles, you also have the option of attaching two D-rings inside the shopper on both sides, to which you can attach a long carrying strap (statement strap or bag chain). Then you can also wear the shopper crossbody. For this you can select the two additional D-rings with edging parts from the additional options. To attach these to the leather, you will need an awl, as the holes for these two parts still need to be punched.
Contents of the DIY box
In the DIY box you will find everything you need to make your bag:
Leather, reinforcement and lining
Leather parts in the color and structure of your choice, cut out and provided with sewing holes
Tailored bonded leather reinforcement pieces
Tailored canvas linings in the color of your choice
Metal accessories in light gold or silver
Magnet to close the bag
8 binding screws for attaching the bag handle
D-ring and small carabiner for attaching various accessories
Round button screw to reduce the bag to a bucket bag
Optional pocket feet
Optional D-rings for attaching your additional carrying option
Optional additional carrying variant of your choice
Supplementary Materials & Tools
Sewing thread in the matching leather color
Saddlery needles with a blunt tip
Document clips to hold the leather pieces together while sewing
Leather glue for gluing lining and leather
Brush to apply the glue
Edge color in the color of the leather
Basecoat as a primer before applying paint
Edge roller pen for applying edge paint and base coat
Abrasive sponge for edge processing
Mini screwdriver with slot for fastening the binding screws
Step-by-step instructions & videos
Download link to the detailed, illustrated step-by-step instructions for making your Perfect Tote (DE, EN, FR)
Download link to the detailed instructions for the basics of leather processing (DE, EN, FR)
Access links to our three explanation videos for the basics of leather processing (DE, EN)
Personalization options
You can optionally apply different personalizations to the shopper. Choose between embossing, the trapunto technique or use pocket patches and rivets to customize your bag.
embossing
The embossing is applied to the leather during production. Letters are clamped into our machine, heated and pressed onto the leather with or without foil. The letters/shapes are approximately 8mm high.
You can choose:
Color of the embossing: Foil in silver, light gold or blind embossing without foil
Position on the bag: bag body, inside pocket, statement strap
Text or motif (e.g. made by me lettering, our logo or an individual monogram)
trapunto technique
Here, forms made of bonded leather are glued between the leather and the lining and shaped against a firm base with an edge former. The result is a raised 3D effect that is more striking than the embossing due to the letter height of 6 cm.
The technique is implemented by yourself (video tutorial available) and is best implemented with our smooth leather or another thinner leather.
Here you choose:
Ready-made letters or motifs with a height of 6 cm
Alternatively material in one piece to realize your own patterns and shapes
Patches, bag charms, rivets
We also offer other personalization options such as leather bag patches, bag charms and rivets. You can order these as separate products in our online shop.
Level of difficulty
Realizable for beginners with a little patience or for everyone who has already made one of our DIY boxes!
It doesn't matter whether you're a DIY professional or have never worked with leather before - with our step-by-step instructions and video tutorials on the basics of leatherworking, you'll get all the important information you need to make this bag by hand yourself manufacture.
Since the materials are already cut out and provided with seam holes, they fit together exactly. This way nothing can go wrong and you can start production as soon as you receive your DIY box. Here we go!
Payment & Shipping
Payment options
SOFORT transfer (login via your online banking)
Payment via PayPal
Payment with VISA, Mastercard or Maestro
Payment via ApplePay or GooglePay
prepayment via bank transfer
Shipping & delivery time
The delivery time is between two and twelve working days.
Sounds long? It is! Since we produce most products manually to order with great attention to detail, we need this time. The production-to-order approach also allows us to offer you several products from the different leather colors instead of just one pre-produced model. Furthermore, we only produce what was actually purchased - to ensure responsible use of our resources.
Imagine you create something with your own hands and you can proudly say: I made it myself! An indescribably beautiful feeling that makes you appreciate your favorite bag even more.
Exactly your style
Choose from countless color and style options and put together your DIY box according to your wishes. Personalize your leather accessory and make it something very special that nobody else has.
It all depends on the quality
The DIY boxes are handmade in Germany after ordering. We pay particular attention to using high-quality materials to ensure that your unique piece has a long life.
Customer Reviews
Overall rating: 5.0 / 5 from 93 reviews.
J'ai adorée coudre mon perfect tot, les explications étaient trés bien et comme ce n'est pas mon premier, mais mon troisiéme sac, je me suis expérimenté au trapunto sur les deux côtés. Et je l'adore, ce cuir coloré va m'accompagner pour l'hiver. Merci
Der Shopper war ein Projekt, das ich mir schon lange vorgenommen und aufs perfekte Leder gewartet hatte - dann kam Caviar in diesem Aubergine-Ton und ich war begeistert! Der Shopper in aubergine passt zu jedem Büro-Outfit und hat mich schon diverse Male ins Gericht begleitet während des Referendariats 🥰
Mein Shopper aus Caviar rund dark lilac ist mein neuer täglicher Begleiter und mein persönliches Highlight in meiner kleinen wachsenden B&P Sammlung 💜 Er ließ sich, dank der abgewandelten Variante für starres Leder, auch sehr gut nähen.
Mein absolutes Lieblingsleder ist dieses Taurillon Grain Matte Leder in diesem Pastellblau und ich wusste sofort, dass ich meinen ersten Shopper aus diesem Leder haben möchte und mit Futterleder fertigen werde. Die Tasche ist genauso schnell fertig geworden und ich liebe es!🥰
Ich liebe meinen tollen Shopper aus Fine Crispel.
Ich habe genau nach Anleitung genäht. Es ist alles in der Box enthalten und mit den Videotutorials und der Anleitubg ist das nähen super machbar. Nur das wenden war eine kleine Herausforderung durch das etwas starrere Leder. Ich liebe alles an der fertigen Tasche. Es wird nicht die letzte bleiben!
Fast fertig ❤️mein vierter Shopper von Bags and pieces ❤️❤️❤️die obere Kantenbearbeitung fehlt noch und dann ist die Tasche fertig …Ich hatte das große Glück, den Shopper in dem Leo-Velours zu bekommen…habe ihn passend zu meiner Leo-Hobo auch mit Kroko-Leder gefüttert…
„Leider“ machen Eure Taschen sehr süchtig ☺️
Ich liebe meine Shopper aus Epi Leder. Diese Tasche habe ich komplett nach Anleitung genäht und Dank der Videos und Grafiken hat das auch prima funktioniert. Das Wenden war etwas sportlicher, aber der Aufwand hat sich gelohnt.
Ich liebe meinen Shopper in Vanilla-Matte-Grain 😍 das Leder füjöt sich so toll an!
Es passt wirklich viel hinein und eignet sich auch als kleines Handgepäck.
Die einzige Herausforderung war die Bodennaht, aber mit etwas Geduld ist auch die gut machbar☺️
Ich habe die Perfect tote in black fine crispel gemacht. Ich bin begeistert. Es macht ganz viel Spaß beim nähen und ich freue mich es jetzt zu nutzen. Es ist bestimmt nicht mein letztes Projekt.
Tasche aus TogoLeder in einem der 99 Taupe Töne. Es war meine erste Tasche der perfekt Tote. Und bis auf den Boden und die Einfassstreifen hat es super geklappt . Den Boden musste ich neu kleben, weil ich nicht richtig gelesen hatte, hat aber im zweiten Anlauf super geklappt. Auch das annähen der Einfasstreifen hab ich zweimal gestartet, da hier die Anleitung mich ein bisschen in die Irre geführt hat. Trotzdem super Projekt! Lieb die Tasche jtzt schon.
Super Anleitung ansonsten und auch gut für Anfänger machtbar. Man darf den Zeitaufwand nicht unterschätzen, hat aber am Ende ein mega Ergebnis! Glaubt mir wieder keiner, dass die Tasche selbst genäht ist und nicht gekauft!
Habe jetzt schon mehrere Taschen gefertigt und würde diese zu den einfacheren zählen!
Daher volle ❤️-Empfehlung!
Als 3. Tasche von B&P habe ich eine Tote Bag genäht. Es ist definitiv mehr Näharbeit als bei einer Saddle Bag, aber es ging ganz gut. Auch die „Naht des Grauens“ fand ich gar nicht so schlimm. Das Leder Tiffany Blue Metallic Used ist toll von der Haptik und ging gut zum Nähen.
Obwohl ich eigentlich keine Handarbeiterin bin, bin ich vom Lederhandwerk begeistert und finde sogar am Nähen Gefallen😃.
Als nächstes wage ich mich an eine Business Bag.
Einen Shopper zu nähen ist nicht schwierig, nur sehr zeitaufwendig. Hier eine Naht und da noch eine, es summiert sich eben.
Das Leder war aus der Matt-SE und ist ein Traum. So eine tolle Haptik und ließ sich super verarbeiten. Habe die Metallic-Kantenfarbe aus dem Adv.-Kal. 2024 genutzt; fällt aber kaum auf.
Die Tasche aus Kroko Taupe war schon teilweise eine Herausforderung, ich sag nur Naht des Grauens 😉😂. Aber mit Geduld gut machbar. Unbedingt die Anleitung ordentlich lesen, ich hab es mir unnötig schwer gemacht durch Unaufmerksamkeit. Es ist aber alles super beschrieben.
Es wird auf jeden Fall noch eine genäht
Meine 3 Tasche habe zu erst die Timless und die sadel genäht !
Die fand ich relativ einfach ! So eine große wie der Shopper ist zwar auch relativ einfach aber die Kanten Verarbeitung dauert ewig 😢 bin so ungeduldig 😂😂🫣 alles in allem aber sehr zu frieden !
Mein Mann hat sie mir geschenkt mit silber Teilen Gold Fänd ich jetzt schöner aber es passt gut zu dem Pastell Advenskalender 😂
Ich habe lange auf den Shopper mit dem Reißverschluss gewartet- und das hat sich gelohnt! Die Tasche ist jetzt mein treuer Begleiter auf Dienstreisen und ein absolutes Raum-Wunder! Neben dem B&P-Wallet und dem B&P-Planer passt auch der Laptop, mein Teebecher und noch ein Täschchen mit Kabeln und Co ohne Probleme rein. Dank Innentasche von Cerrypickinganke haben auch Taschentücher und andere Kleinigkeiten ihren festen Platz.
Und falls ich mal wieder mit der Bahn reise und von einem Gleis zum anderen sprinten muss, ist bei diesen Anlässen der verstellbare Statement-Gurt perfekt.
Das Nähen war problemlos- man braucht halt etwas Zeit- auch die Naht des Fleißes hat mich nicht gestört. Größte Herausforderung war für mich das Kleben des Innenfutters….
Absolute Empfehlung!
Das warten auf den Reißverschluss hat sich gelohnt. Ich hatte Glück, dass ich das selbe Leder bekommen habe. Die Nähte waren echt herausfordernd, vorallem für die Finger. Aber am Ende sieht es einfach sehr hochwertig aus und das zählt. Ich habe die Innentasche von CherryPicking Anke dazu genäht.
Der Shopper ist inzwischen meine Alltagstasche geworden. Perfekt mit Kind, tolle Größe. Für die Arbeit etwas zu klein (Laptop, viel Essen, 1l Trinken, Kaffeebecher etc.) - aber so eine Tasche ist ja „Never Full“
Ich habe die Tasche ohne Magnet, ohne Zugbänder und ohne Reißverschluss verarbeitet und ein eigenes Futter gewählt.
Das Wenden ging, aber wenn es wieder Mal EPI Leder geben wird, schlage ich erneut zu! 🤗🥰 Love it!
Die Tasche aus mattem Leder ist fertig und ich liebe sie. Mit dem verwendeten Futterstoff wurde die Tasche noch persönlicher. Alles gut machbar mit Geduld bei der Kantenbearbeitung.
Diesmal hab ich den Shopper aus dem Strauß geprägten Lammnappa genäht mit Leder als Futter und zum ersten Mal mit Reißverschluss 🤩
Ich sag nur, tolle Anleitung und wunderschönes Leder (wie immer 🥰)
Was für eine geniale Tasche. Ich liebe sie. Das erste Mal, dass ich mich an die Trapuntotechnik gewagt habe und sogar eine andere Kantenfarbe habe ich gewagt. Ich bin total begeistert, wie toll und detailliert die Anleitung ist, völlig verständlich und sehr gut umsetzbar auch wenn manche Nähte mir einiges abverlangt haben, aber umso stolzer bin ich auf das Endergebnis.
Ich vermute sehr, dass das nicht mein letztes Projekt war.
Riesige Tasche für den Alltag mit unendlich viel Stauraum 😍 tolle Optik mit dem Leder einer Sonderdedition in Kroko Flaschengrün war sie relativ schnell gemacht. Etwas Ausdauer braucht man für die langen Nähte, aber es lohnt sich. Mittels der kleinen Seitenbänder kann man diese Tasche auch in eine Bucket verwandeln 🥰
Ich bin - mal wieder - super happy mit meinem Shopper 😊
Das Leder hat eine hammer Qualität und auch die Fertigung hat wie immer einfach nur mega viel Spaß gemacht.
Ein tolles Projekt an dem man Abend für Abend ein kleines Stückchen weiter arbeiten und sich wie verrückt auf das Endergebnis freuen kann 🥰
Die richtige Mischung aus Herausforderung und Entspannung. Viele kleine Projekte für zwischendurch. Für den Taschenkorpus muss man sich Zeit nehmen. Ich liebe sie. Das Trapunto habe ich mit dem Plotter geschnitten.
Ich liebe den Schnitt des Shoppers und bin super happy, das Epi-Leder der franz. Marke ergattert zu haben. Die Farbe ist der Knaller!
In der Fertigung gab es hier und da (hauptsächlich am Boden) ein paar Challenges aber ingesamt ist der Nähen und Fertigen wirklich einfach! Das Innenfutter hat sich trotz genug Kleber und mit dem Nudelholz ausrollen letztendlich gewellt, aber da ich noch einen Taschen-Organizer Nähen werde, wird der, denke ich, die größten Wellen verdecken.
Ich LIEBE diese Tasche!
Nachträglich werde ich mir noch einen Statementgurt nähen, da je nach Jacke und Zusatz“gepäck“ die Henkel etwas eng sind.
Ich liebe diese Tasche.
Nicht nur die Farbe ist der oberhammer, auch die Grösse ist einfach nur perfekt.
Genau so eine Tasche hat mir noch gefehlt. Ist nicht mein letztes Projekt.❤️❤️❤️
Nach der kleinen Tasche ging es an den Shopper. Ein schönes Projekt mit seinen Herausforderungen, die sich mit etwas Geduld sehr gut meistern lassen.
Dass die Tasche verkehrt genäht wird gefällt mir sehr gut. Das sieht nach dem wenden einfach Klasse aus.
Die Entscheidung für die kontrast Naht hat sich gelohnt.🤩
Jetzt habe ich uch einen neuen Begleiter im Alltag.
Wird bestimmt noch ein Shopper dazukommen😊
Der Shopper war im Gegensatz zu den anderen Taschen eine Herausforderung. Vor allem die Nahtzugaben der Bodennaht waren was anstrengender und die Finger taten danach was weh. Ich habe mir aber viel Zeit bei der Fertigung gelassen, sodass die Finger sich erholen konnten. Ich bin mit dem Endergebnis sehr zufrieden. Jetzt habe ich auch eine größere Tasche neben der Crossbody.
Genau vor einem Jahr habe ich meine erste DIY Box von BagsandPieces gekauft. Ein Jahr später ist nun schon meine fünfte Ledertasche mit diversen Tauschklappen fertig. Wer überlegt sollte nicht lange zögern, ihr werdet auf keinen Fall enttäuscht sein. Durch die Anleitungen und vorgestanzten Löcher kann wirklich nichts schief gehen. Ich freue mich mein neues Schätzchen auszuführen.
Nachdem meine Mama meine Tasche von Bags and Pieces gesehen hatte, wollte sie unbedingt auch eine haben. Und diesen Wunsch habe ich ihr zu ihrem letzten Geburtstag erfüllt. Die Freude, die sie darüber gezeigt hat war jede Sekunde Arbeit wert. Denn es ist viel Arbeit, die aber unglaublich viel Spaß macht und einen das Ergebnis so sehr wert schätzen lässt und einen mit Stolz erfüllt. Und mit den guten Anleitung würde ich sagen, es ist für jeden machbar...
Ich liebe die Bags and Pieces Taschen. Nach der Saddle war dies, die zweite Tasche. Kleine Tücken gibt es, die kann man aber gut überwinden. Der Kundenservice ist ein Traum!!! Meine nächste Tasche wartet schon ;)
Meine allererste Tasche ist noch nicht komplett fertig, aber ich liebe jeden einzelnen Schritt und freue mich sehr, wenn sie bald endlich fertig ist und ich sie im Alltag nutzen kann.
Die Schritte in der Anleitung sind super erklärt (Spoiler: trotzdem habe ich kleine Anfängerfehler gemacht 😅🫣) aber das wird nichts an dem tollen Endergebnis ändern. ☺️
Ganz sicher bleibt das nicht mein einziges Projekt dieser Art.
Lange habe ich mich wegen der „Naht des Grauens“ nicht getraut, dann aber nach meiner Business Bag bei der tollen Caviar Special Edition zugeschlagen. Und: wie konnte ich ohne diesen Shopper leben? Er hat die perfekte Größe, lässt sich durch Magnet und das Band super „sichern“ und ist ein absoluter Hingucker. Danke danke danke für diese geniale Box!
Mein zweiter Shopper in einem besondern Leder.
Nude in Strauss-Optik.
Die Fertigung erfordert ein bißchen Geduld und Ausdauer, es ist aber gut machbar und ich liebe das Ergebnis.
Das hier ist mein dritter Shopper von Bags&Pieces und ich finde die Farbe mega!!!😍 Der Shopper ist etwas anspruchsvoller als eine Saddle, aber mit viel Geduld gut machbar!
Das ist meine dritte Tasche von Bags&Pieces und das bisher aufwändigste Projekt. Das Leder war aus einer Spezial Edition und es war klar, dass es was besonderes werden muss. Ich liebe die DIY Boxen weil man als Anfänger sehr leicht ein tolles Ergebendes bekommen kann, aber auch sehr gut seine eigenen Ideen verwirklichen kann. Insgesamt eine unglaubliche tolle Tasche die mir sehr viel Spaß gemacht hat und die ich gerne benutze.
Our DIY box is designed so that you can make your own bag without any previous knowledge of leather craftsmanship. All the materials you need are included in the DIY box, you don't have to buy anything else.
The highlight of our DIY boxes:
The parts are already cut and provided with holes for sewing. This way we can guarantee that everything fits together perfectly and that you can sew the bag by hand without any effort. When it comes to metal accessories, too, we make sure that we only use parts that can be attached without special machines and are still firmly fixed.
As soon as you have put together your DIY box, you will receive an e-mail from us with the order confirmation and access to the instructions and basic videos. You can then look at these in advance or when your DIY box arrives. And then you can get started!
Is the project suitable for beginners?
Our clear answer: YES!
Why are we so sure about that?
Because over 7,000 people have already sewn one of our DIY boxes and over 92% of our customers have never worked with leather before or have only done small handicraft projects. Because the leathercraft techniques of gluing , sewing and edge processing are repeated over and over again and because we have created detailed explanatory videos for all three topics, you will have learned everything you need to make your leather accessory in just a few minutes.
In addition, the leather parts are already cut and provided with sewing holes. So, technically, there's only one sensible way for the pieces to fit together. Of course, we have also explained this with photos and text in our step-by-step instructions.
If, contrary to expectations, you have any questions, our popular and highly rated customer support will be happy to help you. You can reach us Monday to Friday from 9 a.m. to 5 p.m. via email at hello@bagsandpieces.co.
An important clue:
This DIY project is perfect for you if you like trying new things and generally have a certain affinity for DIY and crafting. You don't need to be particularly handy, but you should still enjoy making your own and be willing to learn new techniques.
How long does production take?
As a rough guideline, the shopper takes about 12 to 14 hours to manufacture (including drying times for the edge paint). If you have never made a bag before and are looking at the instructions and videos for the first time, it may take a little longer.
Sounds long?
It is! In the end, however, this is what differentiates handmade things from fast fashion. Many of our customers say that they have a completely different appreciation for their handmade products and are incredibly proud to own a 100% individual and handmade handbag. And beware: addictive!
So if you want some me-time, a balance to your everyday life or some creative time with friends and you enjoy learning new techniques, then time flies by. You can also split the steps up. Another advantage: the production does not take up much space and you can pack and unpack your DIY box whenever you have time.
Where do the leather and other materials come from?
The leather in our standard collection comes from a Veneto tannery that has been working with leather for more than 20 years and supplies many well-known luxury leather goods labels. With innovative methods, especially in the area of water treatment and resource-saving techniques, the tannery combines traditional craftsmanship with modern expertise.
The leather in our special editions mostly comes from surplus sales in Tuscany or is our own production that we commissioned from Italian tanneries. Surplus sales are leftover stocks from major luxury leather goods labels who no longer want to use these leathers as they work in seasonal collections. The leather is carefully selected by us on site, so that we can also offer very good quality and great features here. Treasure hunt, next level!
The other materials such as metal accessories, straps and other supplementary items come from suppliers in the leather processing industry. We source these from all over the world but especially Italy, Spain, Portugal, China and France depending on where we can find the best product for your DIY box.